

Is your baggage missing upon arrival?
That’s frustrating but hey, don’t let this dampen your travel spirits.
Because in this post, I’ll walk you through the process of claiming compensation for delayed baggage with Air Canada, while ensuring your journey continues without breaking the bank.
Step 0. Get an AirTag (optional)

Apple AirTag (or a Galaxy SmartTag2) has truly been one of my BEST travel investments since covid.
While it won’t summon your misplaced luggage like a spell from Harry Potter “Accio TravelPro!“, its tracking feature is invaluable.

What do I mean by that?
Upon arrival, you can immediately verify whether your checked-in bags made it safely with you.
Why does this matter?
Because it allows you take prompt action accordingly.
If your bags arrived with you, then perfect! you’re good to go.
But occasionally, the bags arrive at the airport properly, but I’ve seen it being misplaced on a different conveyor belt or a stranger taking it by mistake.
AirTag becomes handy in this situation as you can track the precise location of your baggage (with AirTag inside) using your phone.
If your bags did not arrive, without having to wait for your never coming baggage on the baggage claim carousel, you can immediately go the baggage office to file a report.
Step 1. Report with Air Canada
The first step you need to do is to find Air Canada baggage service desk (usually located near the baggage carousels) and tell the agent your bag is missing.
You’ll be given a Property Irregularity Report to complete.
It will ask you to provide information such as your flight number, description of your bag, address, phone number.

This is a critical step as this serves as a proof of your luggage not arriving at the airport.
Luckily, this is pretty much all you need to do at the airport level.
You’ll then receive a reference number (or an incident report number), which you can use to track the status of your baggage through WorldTracer.

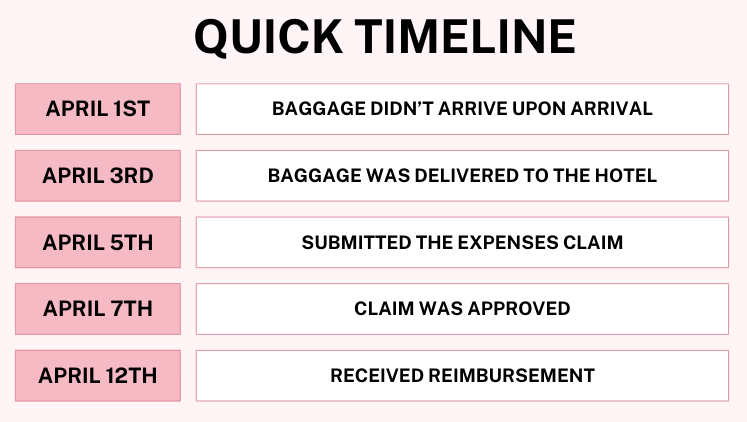
According to Air Canada, most bags are delivered within 24 hours of your flight. (although it wasn’t the case for me and my friends)
Once your baggage is found, you will be contacted immediately to organize a delivery of the baggage. (Usually via email since you’re likely not have a local phone number in the country you’re travelling to)
Step 2. Purchase Necessary Items
As soon as your baggage is confirmed missing, you can begin purchasing necessary items.
Remember to keep all your receipts, as you’ll need to provide them when you file a claim.

Note that you should only be buying essential items that can be reasonably justified.
For example, if you’re headed to a sun destination, it doesn’t make sense to buy a winter jacket or a pair of winter boots.
However, it’s entirely reasonable to buy a swimsuit, sunscreen, toiletries, beach towel, and anything else needed for for your trip that are missing from your delayed baggage.
Step 3. File a complaint & Claim expenses
If your checked baggage hasn’t been delivered to you within 21 days, it is considered lost. See my Lost Baggage post for further steps.
If you received the bag within 21 days, the first thing you should do is inspect for any damages.
If you notice any damage, you must file a Damaged Baggage claim to Air Canada within 7 days.
If everything looks good, you have 21 days to file a Baggage Delay complaint.
Air Canada thankfully makes this process quite straight forward, and here are the steps you need to follow:
1. Head over to Air Canada’s contact page
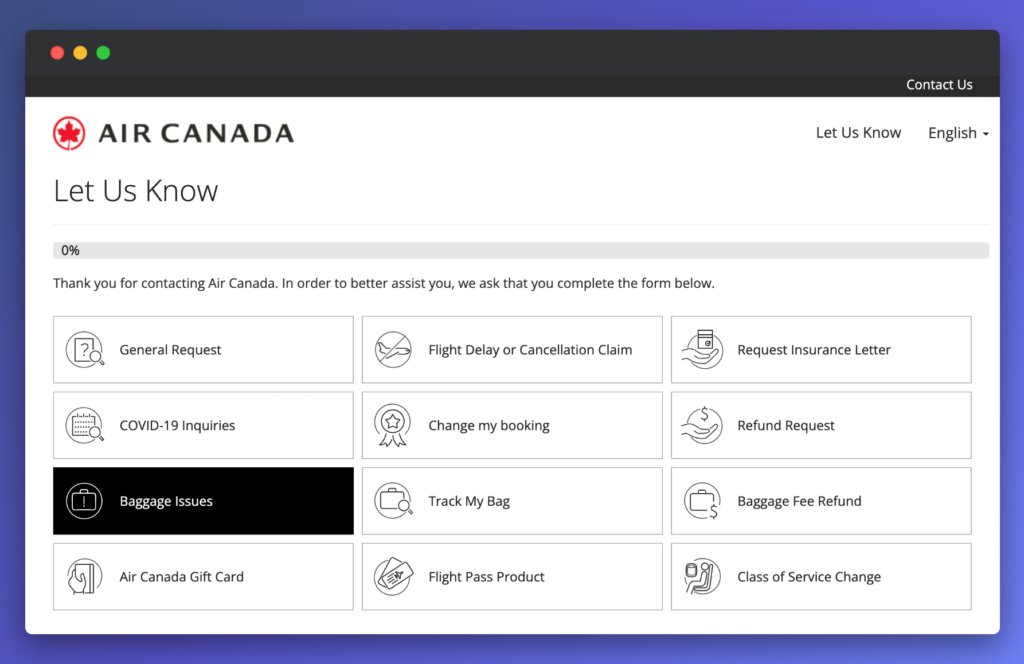
2. Click Baggage Issues – Submit Expenses

3. Fill in passenger information
You can also add another passenger if they were in the same booking reference.


4. Fill in your missing baggage information


5. Add your itemized expenses
Be as specific as possible in this section to minimize delays in the claims review process.
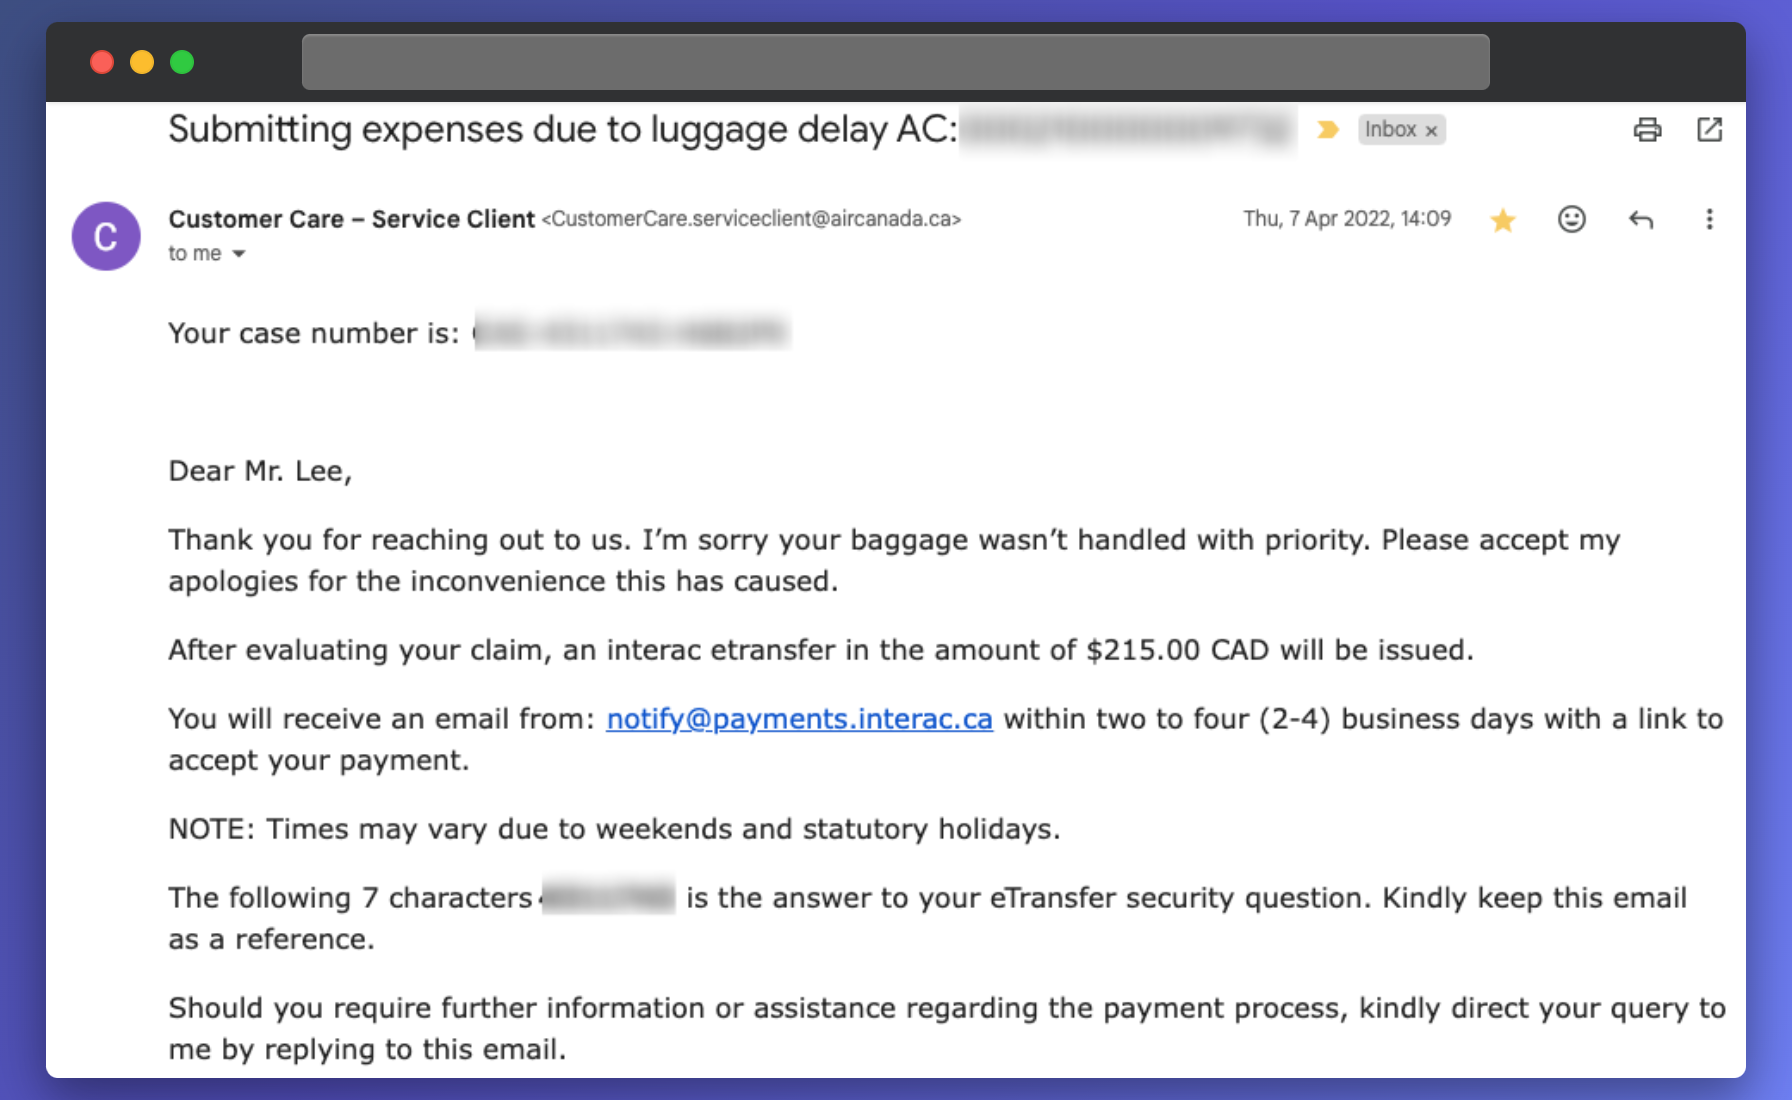
You have the option to list expenses in the local currency, with reimbursement occurring in CAD upon claim approval.
The currency exchange rate applied was very fair in my case.

6. Add additional details as needed
Add any comments in this section.
If there’s an unordinary purchase that might require an explanation, this is the place to write it.
For example, explaining that this trip was to attend your best friend’s wedding may help justify purchase of a dress to the staff reviewing your claim.

7. Upload proof of purchases
This section is where you upload all your receipts for the items you listed in the previous step.

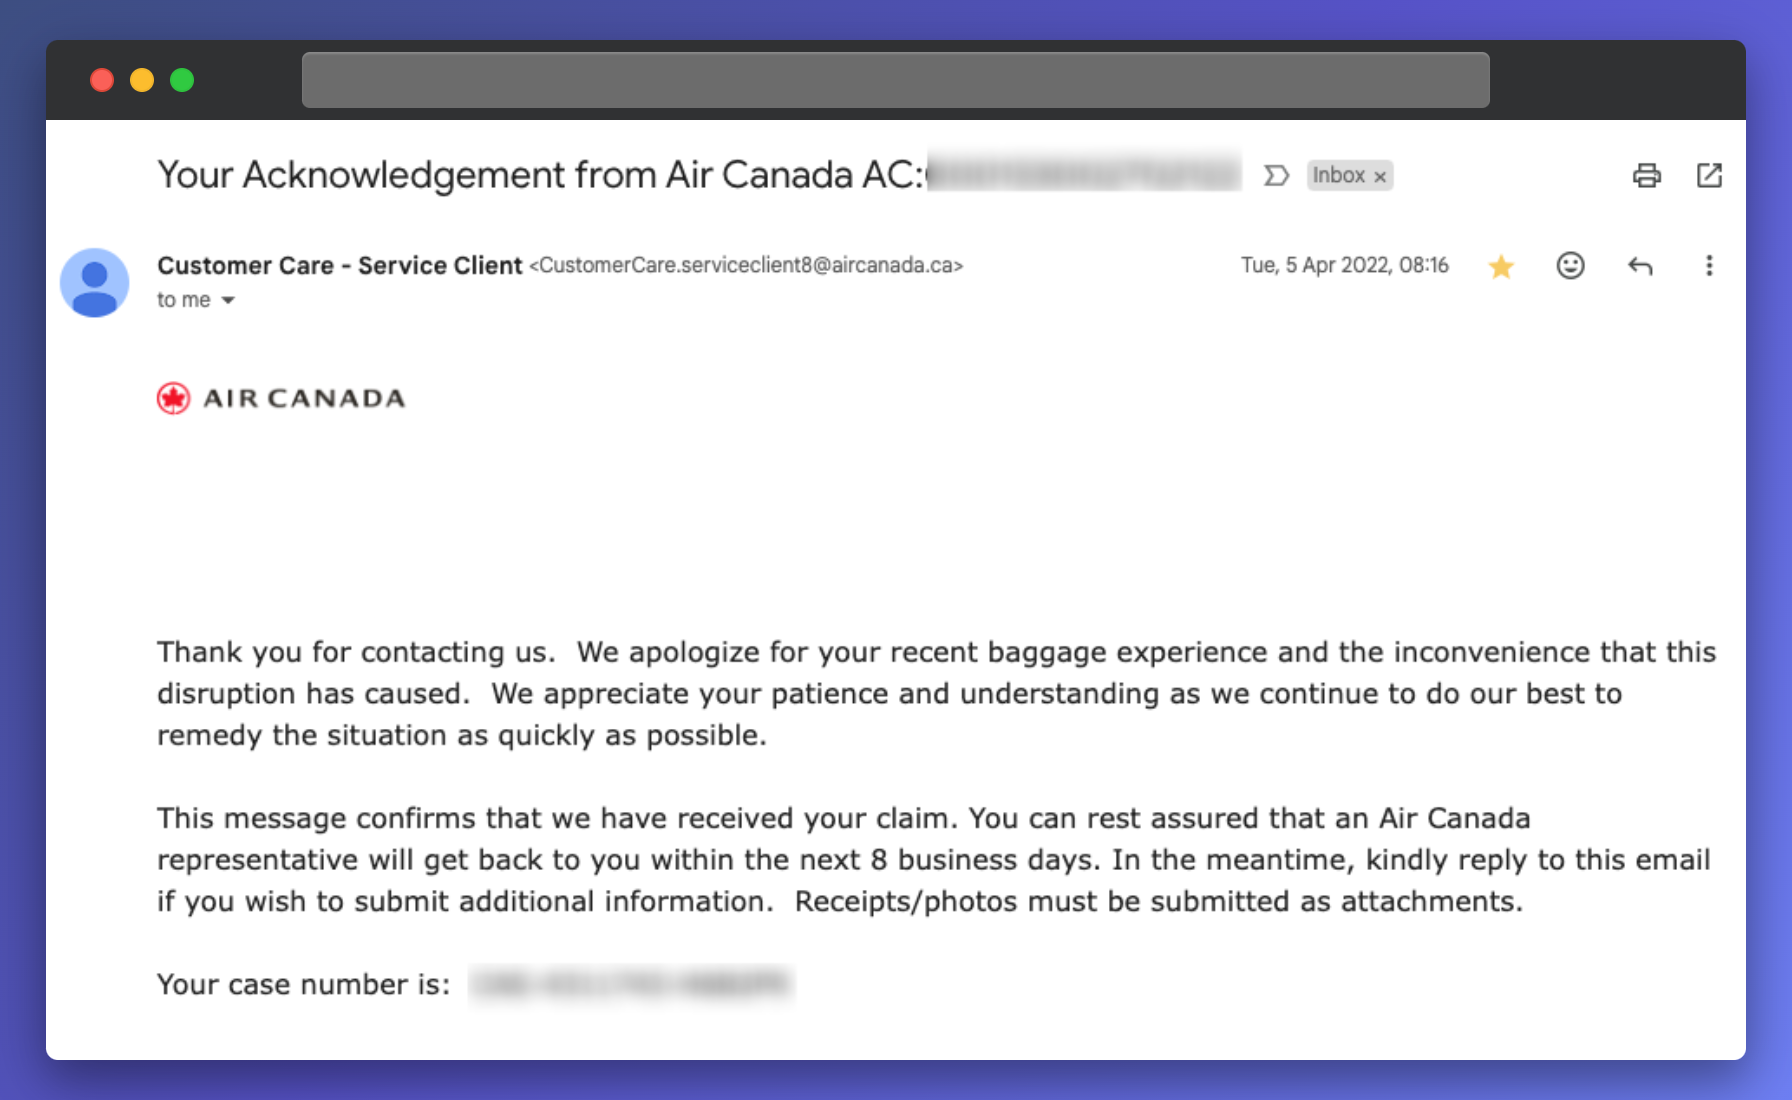
8. Submit your claim
Upon submitting the form, you’ll immediately receive a confirmation email with a case number.
Although the email said it may take up to 8 business days to receive a response, it only took 2 days for my case.

9. Get reimbursement 🤑 🤑

anddddd That’s it! wasn’t it fairly simple?
Final Thoughts
It’s definitely unpleasant to arrive at your destination without your luggage.
Thankfully, Canada’s Air Passenger Protection Regulations offer protection for travelers facing baggage issues, and Air Canada makes it quite straight forward to file claims.
Just be sure to document any expenses incurred to file your compensation claim.
Moreover, if you used a credit card to book your flight, you might be eligible for compensation through your credit card insurance policy.
We’ll talk about this in the next post 🙂